
💡OAuth 란 무엇인가?
- 인터넷 사용자가 웹 사이트나 애플리케이션에서 다른 서비스의 기능이나 정보에 접근할 수 있도록 해주는 개방형 효준 프로토콜
- 사용자가 자신의 비밀번호를 직접 공개하지 않고도, 한 애플리케이션(소비자)이 다른 서비스(공급자)에 안전하게 특정 정보에 접근할 수 있도록 허용
- 해당 프로세는 '토큰'이라고 하는 액세스 권한을 이용하여 이루어진다
- 사용자는 토큰을 통해 서비스에 자신의 정보 일부에 대한 접근 권한을 부여할 수 있으며, 전체 계정 접근을 허용할 필요가 없다
Spring Boot, JWT 를 이용한 로그인 구현에 이어서 진행됩니다.
Spring Boot, JWT 로그인 구현
💡Spring Security 는 무엇인가?자바 기반의 웹 애플리케이션을 위한 보안 프레임워크주로 Spring 프레임워크를 사용하는 애플리케이션에서 인증과 권한 부여를 관리하기 위해 사용사용자가 누구인
orijava.tistory.com
OAuth 2.0 을 이용한 구글 로그인 구현하기
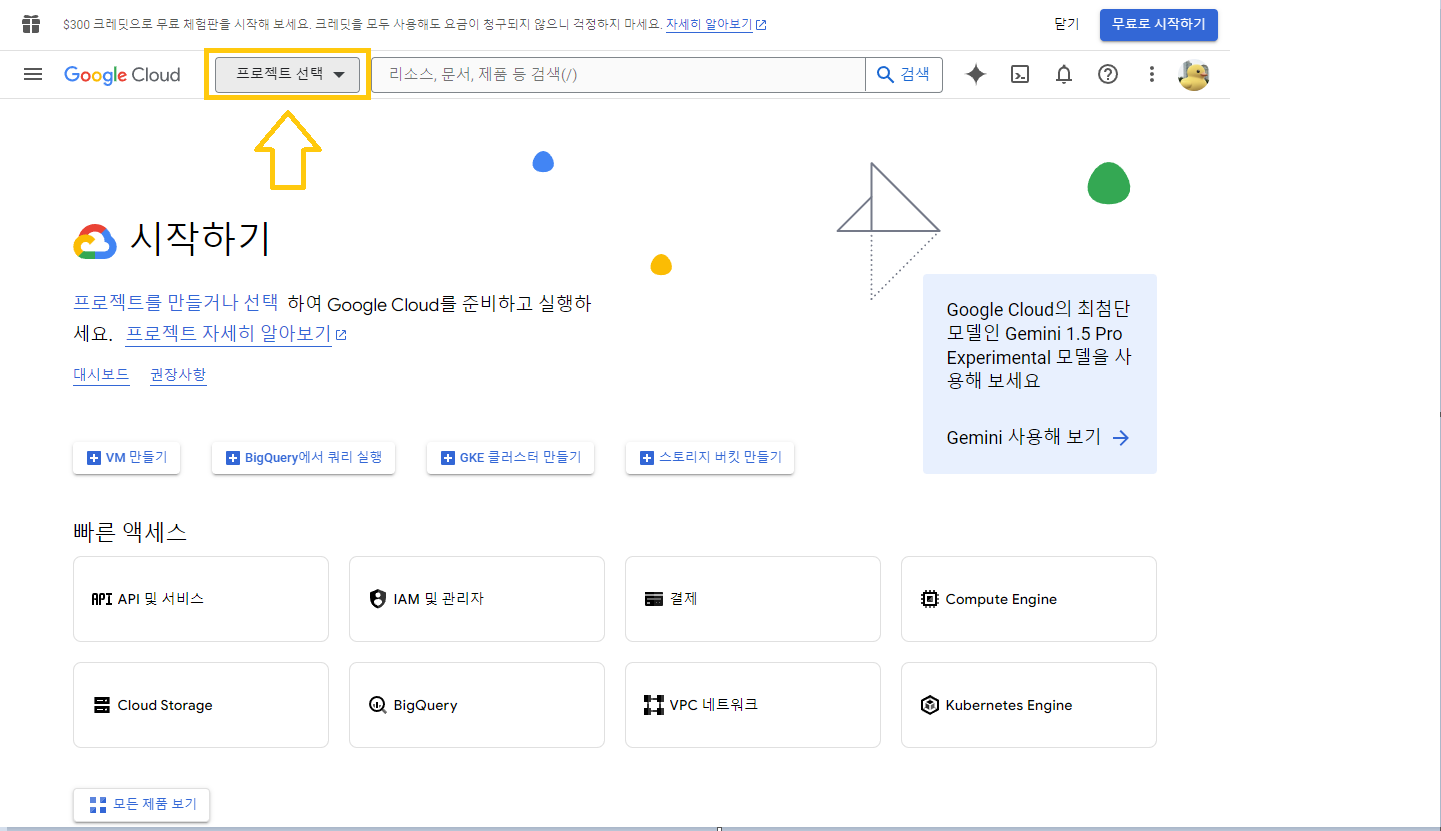
1. 구글 클라우드 플랫폼에서 프로젝트 생성
- 구글 클라우드 플랫폼 이동
- 프로젝트 선택
3. 프로젝트 생성
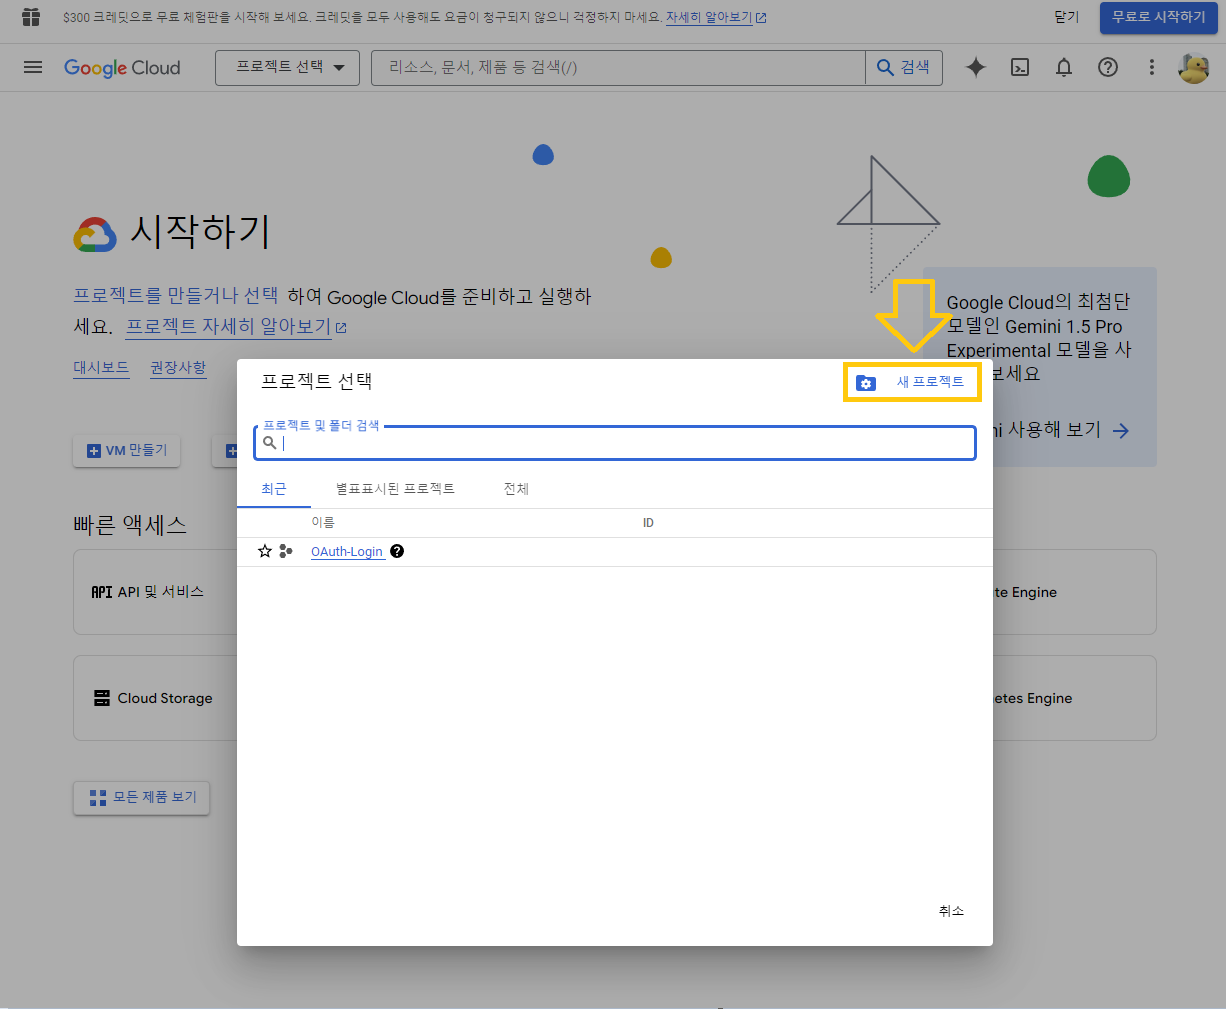
- 새 프로젝트 클릭을 통해 프로젝트 생성
4. 프로젝트 이름 설정
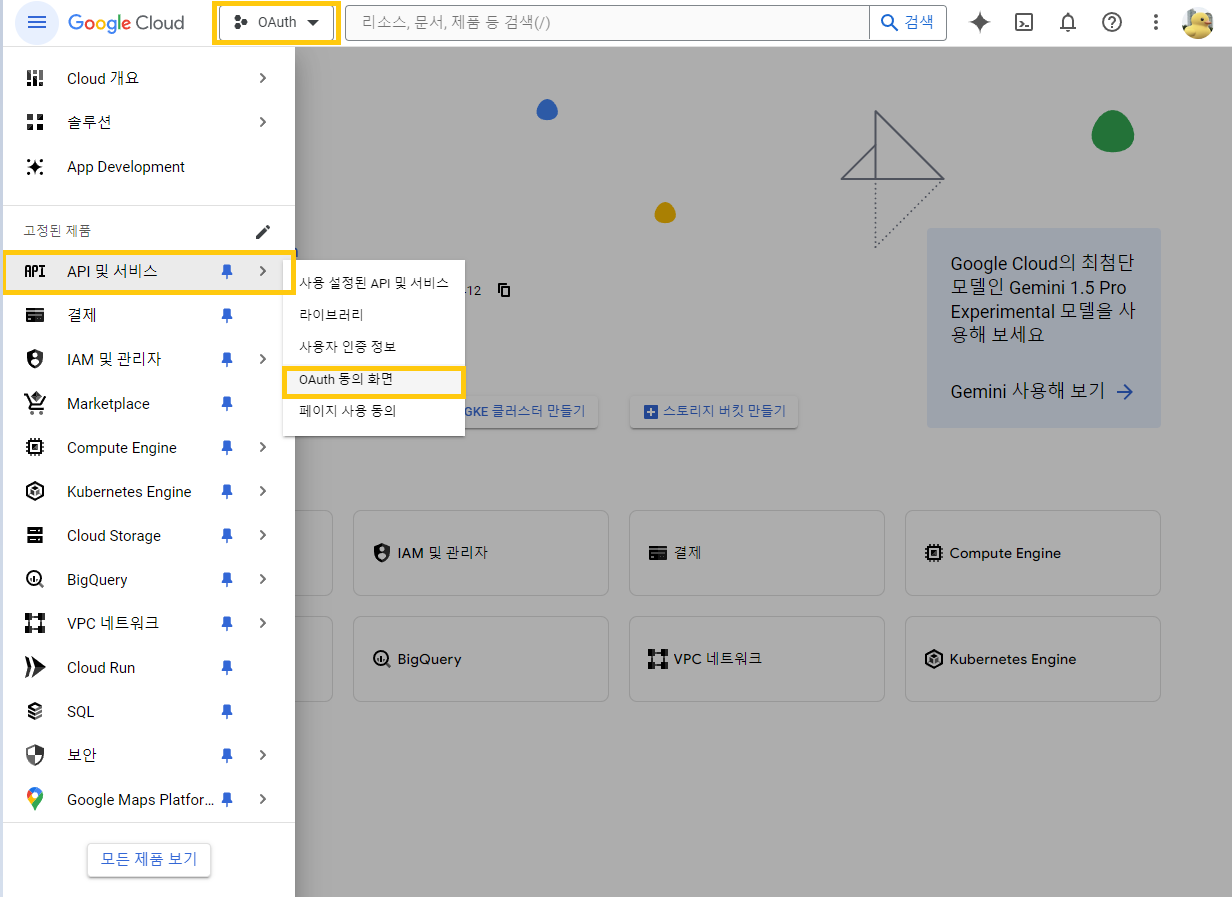
5. 생성된 프로젝트 선택 → API 및 서비스 → OAuth 동의 화면
6. 외부 선택 → 만들기
7. 앱 이름, 사용자 지원 이메일, 개발자 연락처 정보를 입력하고 그 외 필요한 정보 기입 후 '저장 후 계속' 클릭
8. 사용자 인증 정보 → 사용자 인증 정보 만들기

9. 프로젝트에 맞는 애플리케이션 유형과 원하는 이름을 설정
10. 승인된 리디렉션 URI 설정 후 만들기
- 본 포스팅에서는 로컬에서 실행할 예정이므로 'http://localhost:10004/login/oauth2/code/google' 로 설정
- 프로젝트에 맞는 URL 을 설정해 주되 ' /login/oauth2/code/google' 이 부분은 고정
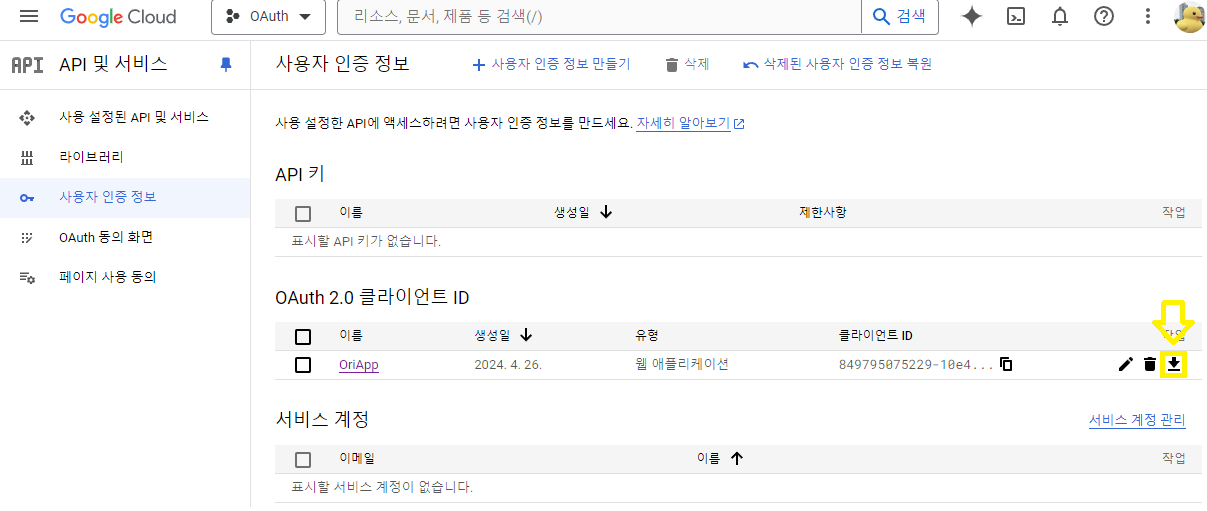
11. 생성된 프로젝트의 클라이언트 ID 와 클라이언트 보안 비밀번호를 다운로드하거나 메모
- application.properties 혹은 application.yml 에 추가해주어야 함
2. 의존성 추가
// dependency for oauth2
implementation 'org.springframework.boot:spring-boot-starter-oauth2-client'
3. application.properties 에 oauth2 추가
# Google
spring.security.oauth2.client.registration.google.client-id= [클라이언트 ID]
spring.security.oauth2.client.registration.google.client-secret= [클라이언트 보안 비밀번호]
spring.security.oauth2.client.registration.google.authorization-grant-type=authorization_code
spring.security.oauth2.client.registration.google.scope=profile,email- 배포 시에는 보안을 위하여 gitignore 에 등록하여 따로 관리하고 환경변수로 등록하여 사용을 권장
4. User 엔티티 스키마 수정
// 소셜 로그인
// 어떤 OAuth (google, kakao, naver, meta)
private String provider;

// OAuth Key
private String providerId;
5. LoginUser 클래스 수정
5-1. 상속 추가
public class LoginUser implements UserDetails, OAuth2User {- OAuth 를 통해 가입한 User 를 LoginUser 로 함께 상속받아 저장할 수 있도록
- 즉, Spring Security 에서 일반적인 인증과 OAuth2 인증을 동시에 처리할 수 있도록
5-2. Map 추가 및 오버로딩
private Map<String, Object> attributes;

public LoginUser(User user, Map<String, Object> attributes) {
    this.user = user;
    this.attributes = attributes;
}- 'attributes' 변수는 외부 인증 제공자(OAuth2 제공자)로부터 받은 사용자 관련 정보를 저장하는 데 사용
- 'attributes' Map 은 소셜 로그인을 통해 얻은 사용자의 이름. 이메일, 프로필 사진 들의 정보가 저장될 수 있음
- 'OAuth2User' 인터페이스를 통해 이 'attributes' Map 을 접근하고 관리할 수 있음
6. OAuth2UserInfo 인터페이스 추가
public interface OAuth2UserInfo {

    OAuth2Provider getProvider();
    String getEmail();
    String getName();
    String getNickname();
    String getProviderId();
}- Goolge 이외에도 Kakao, Naver 등의 소셜 로그인을 추가하기 용이하도록 interface 생성
6-1. OAuth2Provider enum 추가
@Getter
@RequiredArgsConstructor
public enum OAuth2Provider {

    GOOGLE("google"),
    KAKAO("kakao");

    private final String registrationId;

}- OAuth2UserInfo 인터페이스와 마찬가지로 확장성의 용이성을 위해 enum 생성
- KAKAO 를 추가할 경우 위와 같이 추가해 주면 됨
6-2. GoogleOAuth2UserInfo 클래스 추가
@AllArgsConstructor
public class GoogleOAuth2UserInfo implements OAuth2UserInfo {

    private final Map<String, Object> attributes;

    @Override
    public OAuth2Provider getProvider() {
        return OAuth2Provider.GOOGLE;
    }

    @Override
    public String getEmail() {
        return (String) attributes.get("email");
    }

    @Override
    public String getName() {
        return (String) attributes.get("name");
    }

    @Override
    public String getNickname() {
        return null;
    }

    @Override
    public String getProviderId() {
        return (String) attributes.get("sub");
    }

}- OAuth2UserInfo 클래스를 상속받는 클래스 생성
7. CustomOAuth2UserService 클래스 추가
@RequiredArgsConstructor
@Service
public class CustomOAuth2UserService extends DefaultOAuth2UserService {

    private final UserRepository userRepository;

    private final Logger log = LoggerFactory.getLogger(getClass());

    private BCryptPasswordEncoder bCryptPasswordEncoder;

    /*
        userRequest 데이터에 대한 후처리 함수
        함수 종료 시 @AuthenticationPrincipal 어노테이션 생성
        access token을 이용해 서버로부터 사용자 정보를 받아옴 (DefaultOAuth2UserService에 구현되어 있기 때문에
         super.loadUser()로 호출
     */
    @Override
    public OAuth2User loadUser(OAuth2UserRequest oAuth2UserRequest) throws OAuth2AuthenticationException {

        /*
          "registraionId" 로 어떤 OAuth 로 로그인 했는지 확인 (google,naver등)
          loadUser를 통해 회원의 profile을 불러올 수 있다.

          1. 로그인 버튼
          2. 로그인 창
          3. 로그인 성공
          4. authorization code 리턴 (OAuth-Client 라이브러리가 동작)
          5. 리턴된 code를 이용하여 Access Token을 요청
        */

        System.out.println("getClientRegistration: " + oAuth2UserRequest.getClientRegistration());
        System.out.println("getAccessToken: " + oAuth2UserRequest.getAccessToken().getTokenValue());
        System.out.println("getAttributes: " + super.loadUser(oAuth2UserRequest).getAttributes());

        OAuth2User oAuth2User = super.loadUser(oAuth2UserRequest);

        log.info("getAttributes : {}", oAuth2User.getAttributes());

        // accessToken 가져오기
        String accessToken = oAuth2UserRequest.getAccessToken().getTokenValue();

        // provider 가져오기
        String registrationId = oAuth2UserRequest.getClientRegistration().getRegistrationId();

        System.out.println("registrationId: " + registrationId);

        OAuth2UserInfo oAuth2UserInfo = null;

        if (registrationId.equals("google")) {
            log.info("구글 로그인 요청");
            oAuth2UserInfo = new GoogleOAuth2UserInfo(oAuth2User.getAttributes());
        } else if (registrationId.equals("kakao")) {
            oAuth2UserInfo = new KakaoOAuth2UserInfo(oAuth2User.getAttributes());
        } else {
            System.out.println("소셜 로그인 실패");
            return null;
        }

        String providerId = oAuth2UserInfo.getProviderId();
        String email = oAuth2UserInfo.getEmail();
        String username = registrationId + "_" + providerId;
        String nickname = oAuth2UserInfo.getName();

        Optional<User> optionalUser = userRepository.findByUsername(username);
        User user = null;

        // 소셜 로그인 사용자 정보 저장
        try {
            if (optionalUser.isEmpty()) {
                log.info("신규 가입 사용자");
                user = User.builder()
                        .username(username)
                        .nickname(nickname)
                        .provider(registrationId)
                        .accessToken(accessToken)
                        .email(email)
                        .providerId(providerId)
                        .role(UserEnum.CUSTOMER)
                        .createdAt(LocalDateTime.now())
                        .build();

                userRepository.save(user);
                log.info("신규 가입자 저장됨: {}", user.getUsername());
            } else {
                log.info("기존 가입자");
                user = optionalUser.get();
            }

            return new LoginUser(user, oAuth2User.getAttributes());
        } catch (AuthenticationException ex) {
            throw ex;
        } catch (Exception ex) {
            throw new InternalAuthenticationServiceException(ex.getMessage(), ex.getCause());
        }
    }
}- DefaulOauth2UserService 를 상속받아 회원가입을 진행
- userRequest 와 oAuth2User 를 통해 필요한 정보를 추출
- oAuth2User.getAttributes 를 통해 구글에서 받은 정보가 oAuth2User 에 담김
- accesstoken 의 경우 테스트를 위해 추가한 부분이므로 DB 에 그대로 저장하는 것은 보안상 위험
8. HttpCookieOAuth2AuthorizationRequestRepository 생성
- 사용자의 브라우저에 인증 요청 정볼르 쿠키로 저장하여, OAuth2 인증 프로세스 중에 인증 요청을 유지하고 관리하는 데 필요
- 리다이렉트가 포함된 인증 플로우에서 유용하며, 사용자가 인증 제공자로부터 리다이렉트될 때 원래 요청한 작업을 계속할 수 있도록 함
@RequiredArgsConstructor
@Component
public class HttpCookieOAuth2AuthorizationRequestRepository implements AuthorizationRequestRepository<OAuth2AuthorizationRequest> {

    public static final String OAUTH2_AUTHORIZATION_REQUEST_COOKIE_NAME = "oauth2_auth_request";
    public static final String REDIRECT_URI_PARAM_COOKIE_NAME = "redirect_uri";
    public static final String MODE_PARAM_COOKIE_NAME = "mode";
    private static final int COOKIE_EXPIRE_SECONDS = 180;

    @Override
    public OAuth2AuthorizationRequest loadAuthorizationRequest(HttpServletRequest request) {
        return CookieUtils.getCookie(request, OAUTH2_AUTHORIZATION_REQUEST_COOKIE_NAME)
                .map(cookie -> CookieUtils.deserialize(cookie, OAuth2AuthorizationRequest.class))
                .orElse(null);
    }

    @Override
    public void saveAuthorizationRequest(OAuth2AuthorizationRequest authorizationRequest, HttpServletRequest request,
                                         HttpServletResponse response) {
        if (authorizationRequest == null) {
            CookieUtils.deleteCookie(request, response, OAUTH2_AUTHORIZATION_REQUEST_COOKIE_NAME);
            CookieUtils.deleteCookie(request, response, REDIRECT_URI_PARAM_COOKIE_NAME);
            CookieUtils.deleteCookie(request, response, MODE_PARAM_COOKIE_NAME);
            return;
        }

        CookieUtils.addCookie(response,
                OAUTH2_AUTHORIZATION_REQUEST_COOKIE_NAME,
                CookieUtils.serialize(authorizationRequest),
                COOKIE_EXPIRE_SECONDS);

        String redirectUriAfterLogin = request.getParameter(REDIRECT_URI_PARAM_COOKIE_NAME);
        if (StringUtils.hasText(redirectUriAfterLogin)) {
            CookieUtils.addCookie(response,
                    REDIRECT_URI_PARAM_COOKIE_NAME,
                    redirectUriAfterLogin,
                    COOKIE_EXPIRE_SECONDS);
        }

        String mode = request.getParameter(MODE_PARAM_COOKIE_NAME);
        if (StringUtils.hasText(mode)) {
            CookieUtils.addCookie(response,
                    MODE_PARAM_COOKIE_NAME,
                    mode,
                    COOKIE_EXPIRE_SECONDS);
        }
    }

    @Override
    public OAuth2AuthorizationRequest removeAuthorizationRequest(HttpServletRequest request) {
        return this.loadAuthorizationRequest(request);
    }

    public void removeAuthorizationRequestCookies(HttpServletRequest request, HttpServletResponse response) {
        CookieUtils.deleteCookie(request, response, OAUTH2_AUTHORIZATION_REQUEST_COOKIE_NAME);
        CookieUtils.deleteCookie(request, response, REDIRECT_URI_PARAM_COOKIE_NAME);
        CookieUtils.deleteCookie(request, response, MODE_PARAM_COOKIE_NAME);
    }

}- OAuth2AuthorizationRequest 인터페이스를 구현하여 OAuth2 인증 요청 데이터를 로드, 저장, 제거하는 메서드를 정의
- OAUTH2_AUTHORIZATION_REQUEST_COOKIE_NAME : OAuth2 인증 요청을 저장하는 쿠키 이름
- REDIRECT_URI_PARAM_COOKIE_NAME : 인증 후 리다이렉트 될 URI 를 저장하는 쿠키 이름
- MODE_PARAM_COOKIE_NAME : 인증 모드(예: 로그인, 등록)를 저장하는 데 사용되는 쿠키 이름
- COOKIE_EXPIRE_SECONDS : 쿠기 유효 시간. 해당 프로젝트에서는 보안 상의 이유로 180 초로 설정
- loadAuthorizationRequest
- HTTP 요청으로 부터 ' OAUTH2_AUTHORIZATION_REQUEST_COOKIE_NAME' 쿠키를 찾아 해당 쿠키에서 'OAuth2AuthorizationRequest' 객체를 역직렬화하여 로드하고 쿠키가 존재하지 않으면 null 을 반환
- saveAuthorizationRequest
- 인증 요청 객체를 주어진 HTTP 은답에 쿠키로 저장
- 인증 요청이 null 인 경우, 기존의 관련 쿠키들을 삭제
- 인증 요청이 유효한 경우, 인증 요청 데이터를 쿠리로 직렬화하여 저장하고, 추가적으로 리다이렉트 URI 와 모드를 쿠키로 저장
- removeAuthorizationRequest
- 인증 요청을 제거하는 메서드로, 요청으로부터 인증 요청을 로드한 후 해당 요청 데이터를 반환
- removeAuthorizationRequestCookies
- 관련된 모든 쿠키를 삭제
9. OAuth2AuthenticationSuccessHandler 추가
@Slf4j
@RequiredArgsConstructor
@Component
public class OAuth2AuthenticationSuccessHandler extends SimpleUrlAuthenticationSuccessHandler {

    private final HttpCookieOAuth2AuthorizationRequestRepository httpCookieOAuth2AuthorizationRequestRepository;

    @Override
    public void onAuthenticationSuccess(HttpServletRequest request, HttpServletResponse response,
                                        Authentication authentication) throws IOException {
        log.info("Authentication Class Type: {}", authentication.getClass().getSimpleName());
        log.info("Principal Class Type: {}", authentication.getPrincipal().getClass().getSimpleName());

        log.info("OAuth2 authentication successful, processing token issuance...");

        // OAuth 로그인 시 jwt 토큰을 발급 받도록
        if (authentication.getPrincipal() instanceof LoginUser) {
            LoginUser loginUser = (LoginUser) authentication.getPrincipal();
            String token = JwtProcess.create(loginUser);
            log.info("JWT Token generated: " + "{" + token + "}");

            response.addHeader(JwtVO.HEADER, token);

            UserRespDto.LoginRespDto loginRespDto = new UserRespDto.LoginRespDto(loginUser.getUser());
            CustomResponseUtil.success(response, loginRespDto);

            log.info("JWT Token generated and added to the response header");
        } else {
            log.info("Authentication failed: Principal is not an instance of LoginUser");
        }

        String targetUrl;

        targetUrl = determineTargetUrl(request, response, authentication);

        if (response.isCommitted()) {
            log.debug("Response has already been committed. Unable to redirect to " + targetUrl);
            return;
        }
        clearAuthenticationAttributes(request, response);
        getRedirectStrategy().sendRedirect(request, response, targetUrl);
    }

    protected String determineTargetUrl(HttpServletRequest request, HttpServletResponse response,
                                        Authentication authentication) {

        Optional<String> redirectUri = CookieUtils.getCookie(request, HttpCookieOAuth2AuthorizationRequestRepository.REDIRECT_URI_PARAM_COOKIE_NAME)
                .map(Cookie::getValue);

        String targetUrl = redirectUri.orElse(getDefaultTargetUrl());

        String mode = CookieUtils.getCookie(request, HttpCookieOAuth2AuthorizationRequestRepository.MODE_PARAM_COOKIE_NAME)
                .map(Cookie::getValue)
                .orElse("");

        LoginUser principal = getOAuth2UserPrincipal(authentication);

        if (principal == null) {
            return UriComponentsBuilder.fromUriString(targetUrl)
                    .queryParam("error", "Login failed")
                    .build().toUriString();
        }

        if ("login".equalsIgnoreCase(mode)) {

            log.info("email={}, name={}, nickname={}, accessToken={}", principal.getUser().getEmail(),
                    principal.getUser().getName(),
                    principal.getUser().getNickname(),
                    principal.getUser().getAccessToken()
            );

            String accessToken = "test_access_token";
            String refreshToken = "test_refresh_token";

            return UriComponentsBuilder.fromUriString(targetUrl)
                    .queryParam("access_token", accessToken)
                    .queryParam("refresh_token", refreshToken)
                    .build().toUriString();

        }

        return UriComponentsBuilder.fromUriString(targetUrl)
                .queryParam("error", "Login failed")
                .build().toUriString();
    }

    private LoginUser getOAuth2UserPrincipal(Authentication authentication) {
        Object principal = authentication.getPrincipal();

        if (principal instanceof LoginUser) {
            return (LoginUser) principal;
        }
        return null;
    }

    protected void clearAuthenticationAttributes(HttpServletRequest request, HttpServletResponse response) {
        super.clearAuthenticationAttributes(request);
        httpCookieOAuth2AuthorizationRequestRepository.removeAuthorizationRequestCookies(request, response);
    }

}
10. OAuth2AuthenticationFailureHandler 추가
@RequiredArgsConstructor
@Component
public class OAuth2AuthenticationFailureHandler extends SimpleUrlAuthenticationFailureHandler {

    private final HttpCookieOAuth2AuthorizationRequestRepository httpCookieOAuth2AuthorizationRequestRepository;

    @Override
    public void onAuthenticationFailure(HttpServletRequest request, HttpServletResponse response,
                                        AuthenticationException exception) throws IOException {

        String targetUrl = CookieUtils.getCookie(request, HttpCookieOAuth2AuthorizationRequestRepository.REDIRECT_URI_PARAM_COOKIE_NAME)
                .map(Cookie::getValue)
                .orElse(("/"));

        targetUrl = UriComponentsBuilder.fromUriString(targetUrl)
                .queryParam("error", exception.getLocalizedMessage())
                .build().toUriString();

        logger.debug("소셜 로그인에 실패함");

        httpCookieOAuth2AuthorizationRequestRepository.removeAuthorizationRequestCookies(request, response);

        getRedirectStrategy().sendRedirect(request, response, targetUrl);
    }

}
11. SecurityConfig 수정
@Configuration
@EnableWebSecurity
@RequiredArgsConstructor
public class SecurityConfig {

    private final Logger logger = LoggerFactory.getLogger(getClass());
    private final CustomOAuth2UserService customOAuth2UserService;
    private final OAuth2AuthenticationSuccessHandler oAuth2AuthenticationSuccessHandler;
    private final OAuth2AuthenticationFailureHandler oAuth2AuthenticationFailureHandler;
    private final HttpCookieOAuth2AuthorizationRequestRepository httpCookieOAuth2AuthorizationRequestRepository;

    @Bean
    public BCryptPasswordEncoder passwordEncoder() {
        logger.debug("디버그 : BCryptPasswordEncoder 빈 등록됨");
        return new BCryptPasswordEncoder();
    }

    // JWT 필터 등록이 필요함
    public class CustomSecurityFilterManager extends AbstractHttpConfigurer<CustomSecurityFilterManager, HttpSecurity> {
        @Override
        public void configure(HttpSecurity builder) throws Exception {
            AuthenticationManager authenticationManager = builder.getSharedObject(AuthenticationManager.class);
            builder.addFilter(new JwtAuthenticationFilter(authenticationManager));
            builder.addFilter(new JwtAuthorizationFilter(authenticationManager));
            super.configure(builder);
        }
    }

    @Bean
    public SecurityFilterChain filterChain(HttpSecurity http) throws Exception {
        logger.debug("디버그 : filterChain 빈 등록됨");
        http.headers().frameOptions().disable(); // iframe 허용안함.
        http.csrf().disable();

        http.cors().configurationSource(configurationSource());

        // jSessionId를 서버쪽에서 관리안함
        http.sessionManagement().sessionCreationPolicy(SessionCreationPolicy.STATELESS);
        http.formLogin().disable();
        // httpBasic은 브라우저가 팝업창을 이용해서 사용자 인증을 진행한다.
        http.httpBasic().disable();

        // 필터 적용
        http.apply(new CustomSecurityFilterManager());

        // 인증 실패
        http.exceptionHandling().authenticationEntryPoint((request, response, authException) -> {
            CustomResponseUtil.fail(response, "로그인을 진행해 주세요", HttpStatus.UNAUTHORIZED);
        });

        // 권한 실패
        http.exceptionHandling().accessDeniedHandler((request, response, e) -> {
            CustomResponseUtil.fail(response, "권한이 없습니다", HttpStatus.FORBIDDEN);
        });

        http.authorizeRequests()
                .antMatchers("/api/v1/**").authenticated()
                .antMatchers("/api/admin/v1/**").hasRole("" + UserEnum.ADMIN)
                .anyRequest().permitAll();

        // OAuth 로그인
        http.oauth2Login(configure ->
                configure.authorizationEndpoint(config -> config.authorizationRequestRepository(httpCookieOAuth2AuthorizationRequestRepository))
                        .userInfoEndpoint(config -> config.userService(customOAuth2UserService))
                        .successHandler(oAuth2AuthenticationSuccessHandler)
                        .failureHandler(oAuth2AuthenticationFailureHandler)
        );

        // 로그아웃
        http.logout(logout -> logout
                .logoutSuccessUrl("/")
                .invalidateHttpSession(true)
                .clearAuthentication(true)
                .deleteCookies("JSESSIONID")
         );

        return http.build();
    }

    public CorsConfigurationSource configurationSource() {
        logger.debug("디버그 : configurationSource cors 설정이 SecurityFilterChain에 등록됨");
        CorsConfiguration configuration = new CorsConfiguration();
        configuration.addAllowedHeader("*");
        configuration.addAllowedMethod("*"); // GET, POST, PUT, DELETE (Javascript 요청 허용)
        configuration.addAllowedOriginPattern("*"); // 모든 IP 주소 허용
        configuration.setAllowCredentials(true); // 클라이언트에서 쿠키 요청 허용
        configuration.addExposedHeader("Authorization");
        UrlBasedCorsConfigurationSource source = new UrlBasedCorsConfigurationSource();
        source.registerCorsConfiguration("/**", configuration);
        return source;
    }
}- http.oauth2Login(configure ->
- http.oauth2Login() 메서드는 OAuth2 로그인을 활성화하며, configure 람다를 통해 OAuth2 로그인 관련 세부 설정을 구성
- authorizationEndpoint(config -> config.authorizationRequestRepository(httpCookieOAuth2AuthorizationRequestRepository))
- authorizationEndpoint() 메서드는 OAuth2 인증 요청을 처리하는 엔드포인트의 구성을 관리
- authorizationRequestRepository(httpCookieOAuth2AuthorizationRequestRepository) 는 인증 요청을 저장하고 관리하기 위해 HTTP 쿠기를 사용하는 저장소를 설정. 이 저장소는 OAuth2 인증 과정 중에 생성되는 인증 요청 데이터를 보안적으로 관리하는 데 사용
- userInfoEndpoint(config -> config.userService(customOAuth2UserService))
- userInfoEndpoint() 메서드는 사용자 정보를 가져오는 엔드포인트를 설정
- userService(customOAuth2UserService) 는 인증 후 사용자 정보를 업로드하는 서비스를 지정
- successHandler(oAuth2AuthenticationSuccessHandler)
- 인증이 성공적으로 완료되었을 때 실생될 핸들러
- failureHandler(oAuth2AuthenticationFailureHandler)
- 인증이 실패했을 때 실행될 핸들러
프론트 레이어에서의 요청
<a href="http://localhost:[포트번호]/oauth2/authorization/google?redirect_uri=http://localhost:3000&mode=login">
       <button>Google Login</button>
</a>'Back_End > Java' 카테고리의 다른 글
| Spring Security + JWT + Redis (0) | 2024.05.16 |
|---|---|
| Spring Boot, JWT 로그인 구현 (0) | 2024.04.23 |
| Thread 와 Collection (0) | 2024.04.22 |
| 상속과 인터페이스 (0) | 2024.04.22 |
Back-End, Front-End, DevOps 기록 블로그
포스팅이 좋았다면 "좋아요❤️" 또는 "구독👍🏻" 해주세요!


